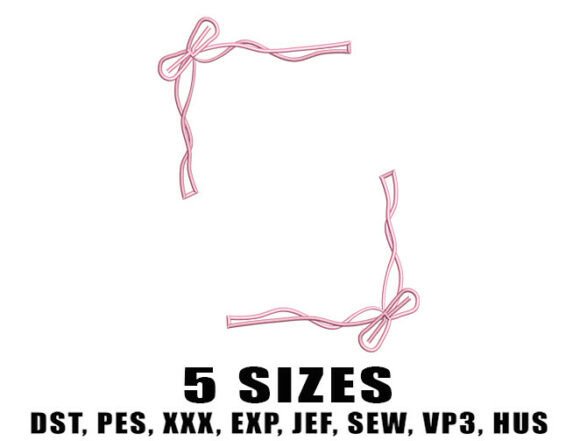
Pink Festive Border Embroidery Design
First Impressions: Charm with Quiet Confidence
When I opened the Pink Festive Border Embroidery Design, what struck me wasn’t flash—it was intention. This isn’t a loud, busy border; it’s a soft-spoken ribbon motif that curls gently into corners, framing space like a thoughtful pause in conversation. The pink reads warm and grounded—not neon, not pastel-weak—but rich enough to hold its own on ivory linen or oatmeal cotton. As a designer who regularly selects embroidery files for client-facing products, I appreciated how immediately *usable* it felt: no over-engineered flourishes, no fragile tendrils begging to snap mid-stitch. It’s a corner border, yes—but one built for real life.
A Real Project Test: Embroidering a Nursery Pillow Cover
Last week, I used the Pink Festive Border Embroidery Design on a 16” x 16” organic cotton pillow cover destined for a baby’s nursery. I placed it in the lower right corner, paired with a simple monogrammed “L” in matching thread—just as the description suggests. The result? Instant cohesion. The ribbon’s gentle curve echoed the rounded edges of the pillow itself, and the pink added warmth without overwhelming the neutral palette. Parents noticed it first—not the monogram, but the *frame*. That’s the quiet power of this design: it doesn’t shout “look at me,” but invites closer looking. For Etsy sellers or boutique owners, that kind of subtle distinction builds trust. Customers don’t just buy a pillow—they buy a curated moment.
Where It Shines (and Where It Needs Care)
The Pink Festive Border Embroidery Design excels on stable, medium-weight fabrics: tea towels, aprons, sweatshirt cuffs, and structured tote bags. On a cotton-blend sweatshirt, it stitched cleanly with standard cutaway stabilizer—no puckering, no skipped stitches. The satin stitch ribbons held crisp edges, and the fill stitch sections stayed dense without bleeding. As a machine embroidery design, it balances detail and durability well.
But—and this is where experience matters—it’s not universally forgiving. On thin rayon or loosely woven chambray, I’d add tear-away *under* the fabric *plus* light cutaway on top. On dark fabric, test your pink thread against the background in natural light: some pinks mute on charcoal or navy, losing their festive lift. And avoid placing it directly on highly textured surfaces like bouclé or thick terry—those tiny ribbon loops can disappear into the pile.
Curved surfaces like caps or baby beanies? Proceed thoughtfully. The corner layout assumes flat geometry. You’ll need to rotate or reposition the design—and possibly simplify small interior details manually if your digitizing software allows. Also, skip pairing it with ultra-fine monograms or script fonts under 8mm tall; the border’s visual weight needs breathing room.
Design Integrity Meets Commercial Sense
For craft businesses and Etsy sellers, the Pink Festive Border Embroidery Design supports brand consistency without demanding uniformity. You can use it across product lines—baby onesies, holiday kitchen towels, bridal shower napkins—and it reads as part of a cohesive collection, not a repeated stamp. That’s rare in digital embroidery files. Its five size options mean you’re not stretching or compressing to fit; you’re choosing the right scale for each item. A smaller version works beautifully on a child’s cap brim; the largest holds presence on a full-size blanket border.
It also elevates perceived value. Handmade product buyers scan for evidence of care—thoughtful spacing, balanced contrast, intentional restraint. This design delivers that. No customer has ever complained that something looked “too finished.” They complain when stitching looks rushed, misaligned, or mismatched. Pink Festive Border avoids those pitfalls by design.
Practical Notes Every Embroiderer Should Check
- Test first—always run the Pink Festive Border Embroidery Design on scrap fabric matching your final project’s weight and stretch.
- Review stitch density before hooping delicate items. Dense fill areas may require lighter stabilizer on lightweight baby clothes.
- Confirm hoop size compatibility. Corner borders can push into hoop edges—especially at larger sizes. Measure your machine’s max embroidery area.
- Inspect small details under magnification: ribbon ends, inner curves, and junction points. If threads look crowded or overlapping in the file preview, adjust tension or stabilizer choice accordingly.
- Try black-and-white mockups. Does the shape read clearly without color? That tells you whether it’ll translate well on low-contrast fabric or in printed listings.
- Use proper stabilizer: cutaway for knits and stretchy baby jersey; tear-away for stable wovens like tea towels or linen napkins.
- Verify licensing before selling finished items or bundling the embroidery file with other design assets. Commercial embroidery rights aren’t automatic—even for seemingly simple borders.
Final Thought: Not Just Pretty—Purposefully Designed
This isn’t a “filler” embroidery file. The Pink Festive Border Embroidery Design carries weight because it solves a real problem: how to frame personalization with grace, not clutter. In a market saturated with oversized motifs and over-digitized florals, its restraint feels refreshing—and commercially smart. Whether you’re stitching a personalized gift for a friend or scaling production for your small shop product line, it performs consistently. It doesn’t ask for special treatment. It asks only that you choose the right fabric, stabilize honestly, and trust its quiet elegance. That’s the mark of a design built not just for machines—but for makers.